
As of January 2020, 61% of companies globally offer some form of remote working policy, with 68% of UK businesses geared up for working flexibly1. A two year study conducted by Stanford University found that staff in businesses offering home working options took fewer sick days, reported less stress and boosted overall productivity. This has become particularly prudent in light of the challenges many businesses face with social distancing and other measures imposed in response to Covid-19. For most organisations, this has increased the need to develop remote working best practice.
Planning for your remote workshop
Remote workshops require careful planning. Whilst upfront effort is required to set up templates for exercises and to make sure everyone knows what to expect, the truth is we can achieve anything we would want to achieve face to face using a mix of remote collaboration tools and taking the time to test what the workshop experience will be like for participants ahead of time.
There are a set of core capabilities that we need to have available to us in a remote workshop setting. The table below shows how these capabilities relate to the tools we have chosen for TPXimpact teams to use:
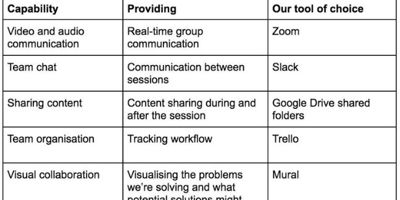
Our advice is: start with what you already have. The tools mentioned above have worked well for us, but if you’ve already signed up for Microsoft Teams and Skype, for example, you can achieve much of the same. All it takes is time and effort to establish how you best use these tools in conjunction with each other.
Top tips for running remote workshops
Here are our tips for running remote workshops in your organisation:
Plan the workshop and prepare your templates
The key task is to think carefully about each exercise and how you will create relevant templates for those exercises on your chosen tools. You also need to think carefully about the transition from one exercise to another and make sure you have clear steps for your participants to follow, so they don’t get lost.
Test the tech with participants
Once you've chosen your tools and planned the flow of your workshop, you'll need to test that the technology works! Book in a pre-workshop tech rehearsal and use it as an opportunity to introduce your participants to the tools and take any questions they might have about them. This way, if issues arise, you'll have time to solve them ahead of the session.
Have a rehearsal
You should also rehearse how the exercises flow before the session. If you’re moving from one tool to another, for example, you need to make sure you can explain this clearly to participants. You can also test the content of the templates you have created. I typically do this with one kind of volunteer in my team.
Share guidance ahead of the session
Share some guidance with the team and client ahead of the session. For example, you may want to ask participants not to have other tabs or communication tools open. You might also want to create a detailed agenda with a summary of which tools will be used for each part of the session, to save participants from getting lost. You could even share some quick tips as a guide for the tool you're going to use, if that tool is new to your audience or if there are some shortcuts others might not be aware of.
Keep cameras ON
Nonverbal cues are useful and hard to come by in a remote session. Ask participants to keep their cameras on so you can see that they’re present and so you can intervene if they’re looking like they don’t understand the exercise.
Have a backup plan…
The tools still might fail, so have a backup plan! This might be as simple as setting the expectation with the client that this new way of working might not work out the first time, or by planning alternative exercises/ways of extracting the information from the client without your preferred tools
Invest the extra time
Remote sessions do require more effort in the setup and testing of the tools. However, once this is done the results are no different to the results we can get face to face.
Offer everyone the same experience
If one participant is remote, then all participants should join remotely. We want to offer a consistent experience to the entire group.
Our chosen tools
Video: Zoom

Zoom is our chosen video conferencing tool for remote workshops. Whilst we can use Google Hangouts for adhoc video calling, Zoom is a stable option which doesn’t require participants to download any specific software. Zoom offers video conferencing and chat features.
Cost: £15.99 per month
Key features:
- Video conferencing
- Text chat
- Raise hand to ask questions (we love this at TPXimpact!)
- Split a large call into smaller groups
- Change your background (so it looks like you’re on the moon, for example)
- Join via link
- Mute/unmute all
Top tips:
- Take new participants through the features so they know how to use them
- Set the ground rules on the call
- Allow extra time when participants are moving from one template to another
- Use two screens (if you can) so you have one for the video and one for working through the workshop templates
Collaboration: Mural
Mural provides a pretty advanced set of collaboration features. You can set up a digital workspace using pre-existing templates (or make your own) and invite teams to it without them having to set up an account (look for the ‘anonymous link’ tab on the share panel).
Mural does offer a chat function, but you will need to use Mural in conjunction with Zoom for video (or other video conferencing tool).
Cost: $12 per user per month, with free access for participants.
Core features are:
- Group workspaces
- Many many pre-canned templates
- Voting
- Exercise timer
- ‘Summon’ feature to bring all participants to the same part of the canvass
Top tips
- Get to know the tool really well!
- You don’t need to use every feature so start simple
- Prepare your template in advance
- Use it as a facilitator and as a participant so you can see how the view differs
Large group conferencing: Remo
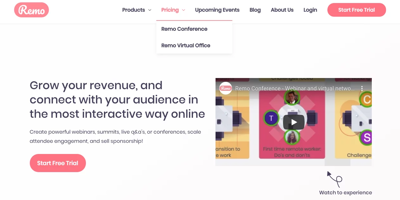
If you need to run a large event remotely where people are required to work in smaller groups, for example, an all-company meeting, then we use Remo.
Remo offers a remote conference space where speakers can broadcast to all and participants can be split into smaller groups, by moving to different ‘tables’ to work. It also offers a chat function for Q&A. You can use Remo alongside Mural for interactive exercises.
It’s certainly one of the best platforms out there for remote collaboration at scale, but as with all these tools, it does come with limitations.
Cost: between $50 and $150 depending on the number of participants.
Key features:
-
Broadcast to all
-
Work in smaller groups
-
Raise hand for questions
Case study – running a retrospective using Zoom and Mural
Goal: To test the capabilities of Mural we ran a remote retrospective with 10 TPXimpact participants and one facilitator.
Step one: choosing the tools and setting up the template
I chose Mural and Zoom for the exercise. Mural comes with a retrospective template which I spent 30 minutes adapting for the session. It allows for ‘locking’ objects so participants can’t edit certain items, such as headings or dividers.
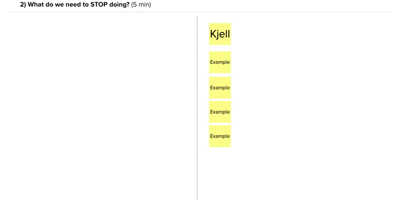
I used the outline feature which allows you to mark a specific area of the canvas and add an instruction. This creates a navigational menu on the right-hand side which participants can use to step through the workshop exercises.
This is one part of the canvas (unpopulated) that we used in the session:
Step two: sending out the instruction
I then sent an outline to participants, stating what they needed to do before the session and what they needed to participate in the session.
Step three: running the session
We then ran the session stepping through each item of the prepared outline. Mural has a built-in voting feature, which allowed me to give each participant a set number of votes that were tallied together during the final exercise.
Step four: follow up
I then asked the team what they made of the experience and they said:
-
Mural worked really well as an interactive tool for workshop activities
-
Making sure guidance and instructions were sent well ahead of time is a key factor in the workshop's success
-
Having a designated facilitator lead is important
-
Ensure you have a backup plan, some of your audience might not be as familiar with online tools so having a backup spreadsheet or Trello is always a good idea
-
Make sure rules are stated at the start of the session, for example, don’t talk over one another. Zoom offers a raise hand feature that can be used to help prevent this
-
Normal workshop rules still apply; no checking phones or replying to emails during the session
Sources
1Global Remote Working Data & Statistics, 2020


Partnering with The Trussell Trust to help meet unprecedented need
We're pleased to share that The Trussell Trust has appointed us their strategic digital partner to support an exciting and ambitious programme of transformation.
Read moreOur recent insights

Women in tech: busting the imposter syndrome myth
Busting imposter syndrome: sexism in tech creates self-doubt. It's not individual weakness but societal bias. It’s time for systemic change and self-awareness.
Read more
A learning curve? Digital challenges facing the Higher Education sector
How can Higher Education institutions make the most of digital technologies and mindsets to operate more effectively?
Read more
3 things to avoid in your charity’s transformation strategy
As you take steps toward change within your organisation, are you overlooking these key areas?
Read more